|
No, as a matter of fact I'm not drawing him the same way twice.
Thank you for noticing. |
Trim came in! Time to get into the real meat and potatoes of this. And by that I mean actually cut some blasted fabric.
|
| None of this "sewing counter the size of a garage" crap here, thank you. You'll take your "not nearly large enough breakfast bar/floor" work space and like it. |
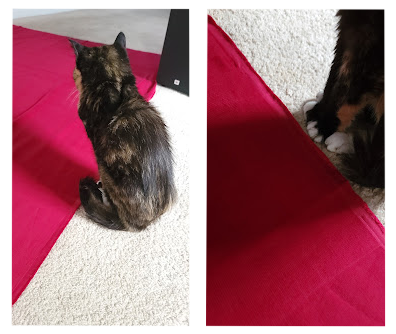
If you're wondering why this has been cut into two sections, again, it's because of the pile. Since this drapes over the shoulder, if it is cut out of a single piece then one side is going to be a nice raspberry pink instead of a cherry red. Which would stick out even more up against the cherry red coat. But if they're cut into two different pieces, then I can make sure the pile is running down on both sides are the same--and appropriate--shade of red.
This illustrates what I'm talking about with the color shifting. Hopefully. Blogger doesn't let you preview an uploaded video, so who knows if the final resolution is high enough to not muck this up.
But yes, anyway, go ahead and stitch the corduroy pieces together. Then do the same for the lining. If need be, scold the cat for walking all over your fabric while you try to work.
 |
| "Joke's on you. Can't get mad if I'm not actually touching it." |
Now that we have our two halves, it's time to make two into one. Last time I mentioned something about trim...
 |
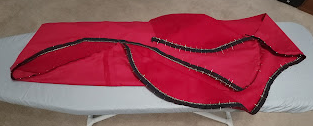
| Hey! It's that previously mentioned trim! |
Fairly sure this was intended for upholstery, but OH WELL. This turned out looking way nicer in person than on the website and that lip means it'll be extremely easy to add without having to do a million and one whip stitches. Which--trust me on this one--is a huge plus.
However, doing things this way does mean top stitching. Which is a little tricky. If the fabric was thicker, I'd say put red thread on top, black on the bottom, set the tension to "auto", and just go. But thin as this is I'm afraid red or black will just end up poking through the wrong sides and showing very, very easily. So what to do?
This looks like a job for invisible thread. A quilting circle staple; it's not actually invisible, per se, but pretty darn close unless you're under the right light. It comes in two forms: polyester and nylon. Poly is generally more durable and nylon yellows over time. Both are still plastic and will melt at around 485 to 500 F or251 to 260 C). So, uh, careful with that iron.
 |
Wow, that looks like a PiTA to work with.
|
It is! Well, it can be. It's plastic, so on top of melting if it gets too hot it can also stretch if you pull it too hard. This is especially a problem when trying to spool it onto a bobbin. Go too fast and the thread's tension gets too taught. Besides stretching and weakening the thread, all this pulling can be great enough to warp or even snap the bobbin.
 |
Want to say something cool like I deliberately warped
a bobbin as a cautionary example, but...no. |
Okay! Enough lesson talk. Back to actual sewing.
Since trim is going on this thing, first go ahead and fold over a seam edge. Then stay stitch the edges and then follow up with the machine. It's way easier to do this by stay stitching first. Especially with that slippery Bemberg. Pin the trim to the corduroy and stay stitch the trim into place.
 |
| Damn near every pin in the cushion. |
Now sew trim. Use a zipper foot to get right up to the bump of the trim. This makes for a smoother (and way less stressful) stitch.
 |
Shining a bright light on the piece so you can actually see the thread.
|
With the trim secured in place, it's just one more round of pinning, stay stitching, and sewing to get the lining in place.
 |
Ugh, this looks good.
|
Only step left then is to sew up the straight edge of the cape. Which feels like a breeze compared to the previous steps. Big ol' boring breeze. Just fold in the edges to get a clean seam, pin, and sew.
 |
| Ta-daaaaaa! |
Not folded correctly, but you get the idea. I will still have to go back and add in the strap to hold it in place, but that's a task for when the mantle part is completed. Feeling pretty chuffed with how this looks.
Next Time: It occurs to me that if I want the mantle to fit correctly, the jacket needs to sit correctly. As is, everything is a little big on me (shirt, vest, jacket) and by the time you get to the top layer of this turducken of a costume, it's actually rather bulky in an unflattering way. So I'm going to take a moment to do some actual tailoring and maybe try to trim this up.
This will also be a good chance to get some small odds and ends fixes out of the way. Have to get over my fear of tying bows sometime.
Material Directory
Trim: Mood Fabrics
Invisible Thread: Joann Fabrics Most any sewing shop
Current background music: Danimal Cannon and Zef. "Glitch." Parallel Processing.
Time until deadline: 76 days